After planting and nice bit of rain to bed the vines into the soil, conditions were ideal for the roots and shoots to start to grow, which didn't take long to be evident... just 10 days after we planted buds were pushing a little bit of green started appearing.

But even before we got to that point, the ubiquitous wild boar, who wander through the vineyards all year round, got a little curious about the little wax-topped sticks in the ground. In a couple of instances, they pulled them up, but discovered that they aren't all that interesting after all! Fortunately, this was right after the vines went in, so we were able to re-plant them with little impact, but because this was still a potential problem, we put up an electric fence to keep them out and getting curious about the vines again!

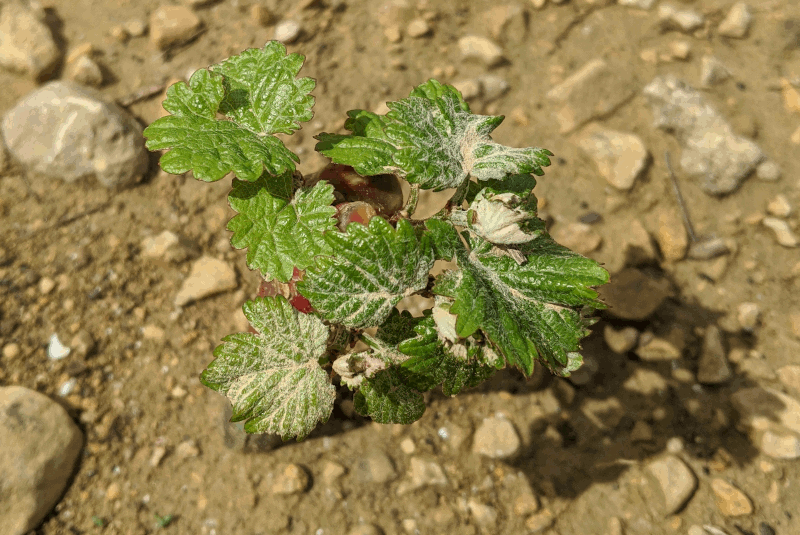
Another issue with the vines came from the nursery. During the grafting process all the buds on the rootstock should be removed, as you only want it to produce roots, not shoots! However, sometimes buds are missed and shoots end up growing on the bottom part of the vine. This isn't good, as the growth takes energy away from the part of the vine that you want to prosper, and the shoots interfere with other management activities and increase canopy density. An example of a vine with a rootstock shoot is shown in the photo below. At the top of the vine is a Grenache blanc shoot, and the reddish leaves below arise from below the graft union, which is just above where those rootstock leaves originate.

The best time to deal with this problem is as soon as you see these shoots, as cutting them out is more difficult the longer they remain on the vine. It can be especially troublesome if the rootstock shoot is growing from beneath the soil surface!
Though we had a couple of decent rainstorms after planting, because the root systems of the vines are so small and delicate, they are very susceptible to drying out. So we definitely needed to get them some of our natural spring water. We took an old plastic tank, mounted it on a trailer and hooked two hoses up to it. Using a few metal rods to hold the hoses in the right place, watering was as simple as driving up and down the rows, pausing at each set of vines before moving to the next!

It was very satisfying to see the vines developing so well - the rainfall, while increasing disease risk in the established vines, was a boon for our little babies! We started to see life amongst the vines, too - insects, earthworms, and even ladybird beetle larvae, which are predators of aphids and all around Good Guys!

To focus the energy of the vines and get them growing upward as quickly as possible, we chose to remove all but the strongest one or two shoots, which goes counter to what most managers do in the area. However, we want the vines to get established on the trellis as soon as possible, to enhance root system development and make management easier.
Because we only want the best for our vines, to give them a bit of a boost we purchased some bamboo stakes and paper tubes, which are designed to protect the vines from the wind and direct sun. It also makes them grow upwards more quickly, and keeps the rabbits and hares from eating the green shoots. But before we could apply those, a little elbow grease was necessary to remove the weeds from around the base of the vines

Once that was done, the stakes and sleeves could go in...

The electric fence continued to do it's job keeping the boar out, although there was evidence that they did try to push through!

It was great to see the progress, and soon some of the vines were peeking out of the tops of the vine guards.

Lifting the guards off revealed the effects on shoot growth. In the photo, see that the internodes (distance between leaves on the shoot) at base are very short - this was before the guard was put on. Above this the internodes are longer, which is a result of less stress on the vine. This picture was taken less than 3 weeks after the vine guard was put on, so growth was very rapid.

The next job was to start putting in the trellising system so the vine growth can be supported. We've just completed putting in the metal intermediate posts, and after this is putting in the wooden end posts, their anchors and stringing up the fruiting wire, to which the shoots can grow.

In our next chapter about the new vineyard we'll check up on how the vines are growing and what the trellising system is looking like! Until then, À votre santé!